A while back, I rented some MOTU DVD's looking for some Mekanek reference to one day make a music video with. When I found out some of the discs had production art, I had to take some screen shots for "educational purposes".
check out these Teela designs.
Sunday, May 23, 2010
Monday, May 17, 2010
Justice League Turnaround and model sheets
Here are some Bruce Timm model sheets I found online to share.
The process will follow the submission of designs narrowed down to an approved design, such as this Batman design. lines will delineate the shadow shapes/highlights.
then a turnaround will be produced from it.
these others are pretty cool too.
The process will follow the submission of designs narrowed down to an approved design, such as this Batman design. lines will delineate the shadow shapes/highlights.
then a turnaround will be produced from it.
these others are pretty cool too.
Monday, February 1, 2010
Character Design Challenge results Feb 1st
Well, For the first challenge, we decided on a Serial Adventure character. Our character choice was narrowed down to "Lesbian Cargo Pilot". Submissions came in from Greg Allen, and yours truly.
I went with a standard character turnaround in the similar design style to Superjail, yet a bit more stylized in the anatomy.
Greg went with cartoon style, and submitted sketches in black and white.
Shay Lurie...
Greg Allen...
So, here's my cargo pilot bush bumper. Like I said, rough, not colored, but damn, look at those mamba jambas!
Wahab Algarmi...
Thursday, January 21, 2010
Alex Toth was Awesome!!! (...and forever will be.)
I was doing some research for some cool model sheets to exemplify coolness. I found these Alex Toth designs for a bunch of shows back in the 20th century... He was definitely one of the best character designers of the 60's and 70's for cartoon television. His stuff is RAD!!!
Alex Toth (June 25, 1928–May 27, 2006), pronounced with a long "o," was an acclaimed professional cartoonist active from the 1940s through the 1980s. Toth's work began in the American comic book industry, but is best known for his animation designs for Hanna-Barbera throughout the 1960s and 1970s. His work included Super Friends, Space Ghost, The Herculoids, and Birdman.
For more Toth go... here!
Alex Toth (June 25, 1928–May 27, 2006), pronounced with a long "o," was an acclaimed professional cartoonist active from the 1940s through the 1980s. Toth's work began in the American comic book industry, but is best known for his animation designs for Hanna-Barbera throughout the 1960s and 1970s. His work included Super Friends, Space Ghost, The Herculoids, and Birdman.
For more Toth go...
Wednesday, January 20, 2010
concept sketches
Monday, January 18, 2010
Sunday, January 17, 2010
Saturday, January 16, 2010
Challenge No.1 -Vote for you fav. 3 genres
WAHAB
1. steam punk: robot /damsel not in distress
2. roaring twenties: Gatsby type dude, arrow collar man/ servant
3. Vietnam war: helicopter gunner / field commander
4. Greek Gods: Zeus/ Athena
5. Spy movies : tech heavy spy, maybe some splinter cell type looking stuff/ classy bond type dude
6.BONUS GENRE! Nascar : guy that waves the flag for the race/ pit crew person
-----------------------------------------
GREG
Muppets:
1) space muppet
2) homosexual muppet
3) zombie muppet
4) Nerdy muppet
5) boozey muppet
60's:
1) Space Hippie
2) Politician (tricky Dick pirate)
3) Homemaker mom hooked on roids
Horror films
1) Psycho Norman Bates goes dancing
2) Werewolf porn king
3) Franken-pimp
4) Freddy Kreuger baby
Disney characters gone wrong
1) shark attack Ariel
2) coke head Snow White
3) Homeless vet Mickey
4) Alladin genie with genetic morbid obesity
5) Pinnochio the pyro
Superhero crossdressers:
1) greatest american hero
2) wonder woah-man
3) plastic man
4) Optimus Prime
5) He-man
-----------------------------------------
MIKE
Robots!!!!
Animal robots
Viking robots
sandwich robots
us as robots
-----------------------------------------
SHAY
MUSIC
Electro-punk Diva
Hairband Guitar god
Goth-Groupie
Heavy-Metal thrasher
Hardcore Skin Head
SERIAL ADVENTURE
Scumbag Treasure Hunter
Mongoloid Chinese Pirate
African Witch doctor
Lesbian cargo plane pilot
Boy Adventurer
HARD BOILED
Blind detective
Cyborg Hitman
Rat-Thief
old Chinese medicine man
Tattooed Prostitute
Repo-man
POST-APOCALYPSE
postman
horde leader
road warrior
six-string samurai
Desert farmer
NORSE MYTHOLOGY
Ice Giant
gnome
odin (or any norse god)
baba yaga
Viking warrior/sailor
FURRIES (talking unclothed Animals)
pot-head lizard
horny dog
crotchety groundhog
obese beaver
smoking skunk
ANTHROPOMORPHS (animals/objects dressed up like people)
candy
Rock
Candy Addicted Watermelon/Fruit
happy Birdcage w/bird
ANTHROPOMORPHIC INSECTS
Bee
Dung Beetle
Tarantula
Roach
Flea
Friday, January 15, 2010
Adventure Time!!! web pilot
Produced a while back, this was the pilot episode which greenlit the series. You can imagine from the production art, how much richer the show will look.
ADVENTURE TIME CH MODEL SHEETS
Continuing on the Adventure Time theme from the last post, I wanted to share some model sheets I found on the Adventure Time Blog. Obviously, these images are the copyright of Cartoon Network, but we are simply using this for Educational Purposes.
For the main characters of the show, Designers create the full turnaround of 5 poses, such as the following...
These Model sheets are produced without guidelines. For whatever reason, they decided to be loose with the poses in the turnaround.
In the next model sheets, you will see that they're creating the designs quite traditionally. The characters are inked with what looks like a brush, or brush pen. The only guides used are a size relation to the main character. For this somewhat main incidental character, they stopped at the 3 pose turnaround, eliminating the need for the front and back.
For even lesser characters that may only be on screen for short periods of time, like in a mob or crowd, production tends to need even less info, ranging from 1-2 poses.
Friday, January 8, 2010
Character Turnaround Clean-Up
So, This is what your character Turnaround mike look like if you were me...
I cleaned up the lines and added a simple color palette. I used 7 colors total, (not including black or white). Generally you want to add minimal highlight and shadow. I could add a couple more shadows and highlights if I want, but in production, this would make it more laborious for the overseas animators.
What are your thoughts?
Shay's "How To" Character Turnaround
In this posting, I am going to go though some quick and easy tips on how to create your turnaround.
For this exercise, you will need either Photoshop (or some other similar graffic application) or a light-box and lots of paper. I recommend Photoshop and some kind of wacom tablet, preferably a syntiq. However, for this exercise, I used only a basic tablet on my laptop mac.
STEP 1)
On a new layer, sketch out some shapes to build your character. The simpler, the better, as this character is being designed for cartoon animation.
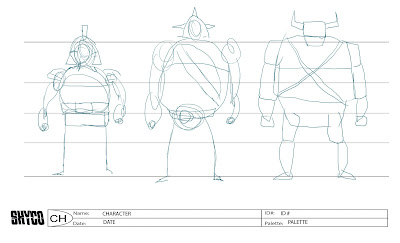
STEP 2)
Reduce the opacity of the sketch layer.
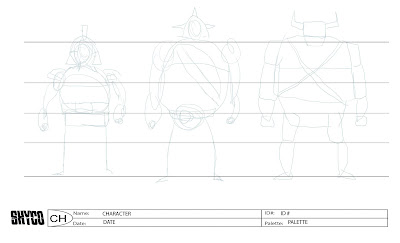
STEP 3)
Design your character. I prefer the straight on view first, however, the industry is primarily looking for the 3/4 front, as most characters on-screen are regularly in this view. Although, for the turnaround, I will create the 3/4 front from the straight on front, so it doesnt matter.
(it only matters if you are NOT going to do the turnaround.)
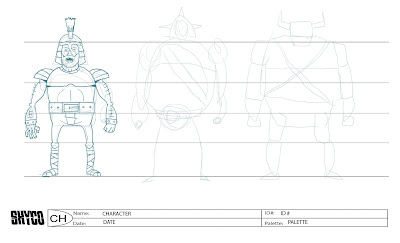
I like to use a color in my line, usually something bluish. This is my preference, though you can use whatever you like, of course. The reason is that i can use different colors when updating or correcting later and colors easily differ from the black line I will use in the clean-up... but again it doesn't really matter. In the end, you will reduce the opacity of your rough during cleanup anyway.
tip: I did a little cheat here and copied the left arm and flopped it onto the right to give the limbs some symmetry.
If you are using a lightbox, a scrap paper sheet is handy to trace onto and off of again.
STEP 4)
Turn off your sketch. Reduce the opacity of your rough. Create a new layer, and draw your 3/4 right on top of your Straight pose. Try to keep the shapes and proportion identical, and simply move the center line over. Adjust your curves in alignment with this new axis.
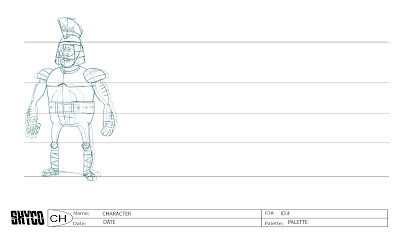
Tips: You might redraw the arms exactly, but maybe turning some of the details a little (like the arm hairs and the wristband details). Then, adjust the positioning and scale slightly. The right arm (or close arm) is moved in closer to the chest, while the shoulder is clearly in the forefront of the body. Also, I increased the size to 105%. The Left arm (or far arm) is decreased in size to about 95%. This trick kind of simulates a foreshortening effect, while maintaining the accuracy of the design. Also, this trick is harder to pull off with a lightbox.
STEP 5)
Move the design over and decrease the opacity. Create a new layer and draw your profile view right on top of your 3/4 front.
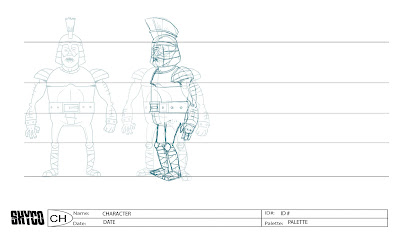
This view is the most drastically different of all the views. This is where your drawing skills and talent are really tested, I think. Drawing right on top has the advantage of helping you line up all the features accurately. Be sure to pay attention to the feet that they are planted on the same plain.
STEP 6)
Move your profile design over. Take your 3/4 view and flop a copy of it to use as a foundation for your 3/4 back. Move it over to the far right of your lineup and maintain a low opacity.
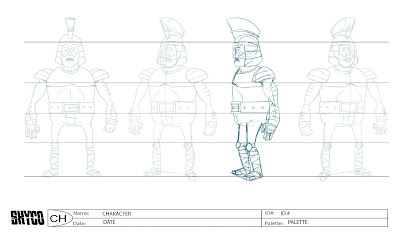
Basically, you have to imagine the back and how you can fit it into the silhouette. this might be challenging the first few times, but once you get the hang of it, you will find it pretty basic.
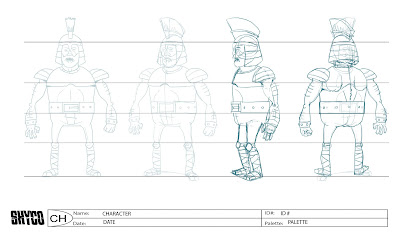
I composed this figure facing to the left, however you can try facing him to the right as well.
on a seperate layer, I used the first 3/4 view as reference for the crest of the helmet and just moved it over and superimposed it.
The biggest challenge here is redrawing the feet onto the same plain.
STEP 7)
Now, turn off your 3/4 reference. Align and space your designs appropriately. Create a new layer underneath the design layers and with your lasso tool, make a selection in the shape which best encapsulates each design and fill it with white to mask out the lines on the template. I prefer to make a folder for each view which I keep the"mask" layer for each design separate for the others.
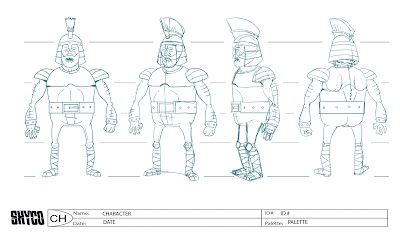
If you like, you can add one last view, but its not really necessary. This view would be the straight back view. I am sure you can figure out how to do that after following through on the 3/4 back view.
Now that you have you're character turnaround rough, you can proceed to ink it or "clean up". If youre using a tablet, you might want to explore using the path tool in photoshop, as it will give you some nice clean lines and curves and also there is an option to vary the width of the line which can give a dynamic look. otherwise, if youre using a syntiq, tracing it is a breeze with the brush tool.
IN CONCLUSION)
I hope this is helpful and inspires you to create a shitload of turnarounds that will land you a job designing characters for whatever industry you have your heart set on.
ART TEAM GO!
Thursday, January 7, 2010
ART TEAM GO!
Welcome to the Art Team Go character design forum.
1) To start, copy the template to your desktop to use when designing your characters. (to do this, click on the image to view full size.... then drag to desktop) This template is in 300dpi res. To draw, I recommend using a range of 3-5 size paintbrush in photoshop.
You also might like to include your own logo into the bottom left hand corner.
2) In the coming weeks, I will be posting an assignment based on feedback from all the participants. You will have up to 2 weeks to post your submission which can range from concept sketches, a character illustration, to full color character turnarounds.
3) Once all our designs are posted, you will have the opportunity to give and receive feedback from all participating artists. I recommend everyone say something about everyone's work (from a simple exclamation to a full analysis). This will help everyone to improve their designs and understanding of design. (however, please be sensitive, thanks)
4) In addition, I will try to post other helpful design tools, links and literature. I have access to some "how to" materials regarding the Venture Brothers, the Simpsons, and Futurama, which might be handy if we choose to challenge ourselves in those styles.
5) If you have helpful materials or know of links you would like to share and wish to have contributing privileges on this blog, I would be happy to set that up for you.
RULES:
1) From a list of genres, we choose one every other week
(i.e. Sci-fi, Superhero, Fantasy, Detective/hard boiled, etc...)
2) From a list of characters, we choose one or more.
(i.e. robot, Tiger villain, Scottish warrior, Killer dame, etc...)
3) create concept sketches for possible review. (if you would like help narrowing down to one character, you may post your concept sketches for comments)
4) Ideally, on a template, create a 3/4 front and 3/4 back. (color optional)
options
...we can choose an established style to work in, like "samurai jack" or "simpsons" or "Justice League" or "superjail" ... whatever we vote/agree/decide on.
...hands, expression and mouth charts
Recruiters want to see...
1) Creativity and an original style
2) The ability to adapt to other styles
& especially
3) Character turnarounds!!!
(if you know someone you would like to invite to participate, please forward and have them contact me at shay@shyco.com.)
ART TEAM is a GO!!!
Shay
Subscribe to:
Posts (Atom)